Archive for November, 2011
No-Sew Fleece Blanket
No-Sew, Single Layer, Fleece Blanket
Here is a fantastic opportunity to make something without having to sew! This particular project is great for creative kids & adults who love to make things, and is often used as a “Project Linus” donation when completed.
All you need is 1½ yard of no-pill fleece (it won’t ravel or pill up), a ruler, a marking pen or pencil, a pair of sharp scissors, and about an hour of free time.

1st – Remove the selvages off of the two sides.


2nd – (Optional) Square off the end/edge where they cut it at the fabric store. They usually cut it unevenly.

Then, cut a 4” X 4” square out of each of the four corners. I have my fabric folded over so that I am cutting two layers (two corners) at once.


Now, use a pencil, evaporating fabric marker, or chalk to mark a line four inches above the raw edge, connecting the inner corners of the squares you just cut out. This line will be your “stopping point” with your scissors.

Yes, I am a little uneven here, but it will not be evident in the final product. This is such a forgiving project!

Next – Using a ruler for a guide, cut one inch strips (doesn’t have to be exact) up to the line you just made. My fabric is still folded over, so I am cutting two strips simultaneously.

Fold each strip all the way up to where it meets the body of the blanket, and snip a small section in the middle of each strip creating a hole.


Finally, grab the strip and push it back through the hole.


Tug lightly. Continue this all the way around the blanket. (It looks really nice if you only pull every other one [strip] through the hole from the top-side, and the remaining strips pull through the hole from the bottom-side.)

That’s all there is to it! Now, you have a finished blanket. These make great gifts, sporting event bench warmers, ministry donations, travel blankets, and more! You can even customize them by using favorite college team colors. Have fun!
Warmly,
Jen & Dee

***Click HERE for a PRINTABLE version (pdf)
We’ve joined the following hops to share our ideas this week: (Please visit one, or all, of these great sites for countless free project ideas and inspiration! If you are visiting from one of these great sites, thank you for coming!Your comments are truly appreciated.)
MONDAY:


TUESDAY:


WEDNESDAY:


THURSDAY:


FRIDAY:


SATURDAY:


Visit us online for other great projects and products!
Shop Small – Small Business Saturday – SAVE $40!
Celebrate with us on 11/26/2011
Help support Small Business Success!

Dear Friends,
This November 26 is a big day for everyone at Modesty Matters. It’s the second annual Small Business Saturday®, when people across the country come out and shop to support their favorite small businesses.
For this special event, we will be offering our popular 12 week curriculum, “You CAN Sew!” for only $129, with FREE Shipping! That’s a $40 SAVINGS!

No prior skill set or knowledge of sewing is necessary for this course to be a successful addition to your day. All you need is a basic working sewing machine, a TV/DVD player, and this course. Adults and children can learn side-by-side. Don’t wait! Add this life-long skill set to your repertoire today!
Click HERE to take advantage of this offer and support small business success, or simply go to www.ModestyMatters.net to peruse our other great products.
Don’t forget to “Like” and recommend us on Facebook at facebook.com/YouCANSew.
Happy Thanksgiving!
Warmly,
Jen & Dee
Creative Deviations
Hello! I am recovering from the flu, but found enough energy to post this “must see.” I have some fun creative deviations for you from last week’s project where we made the DIY Felt Gift Card Holder / Ornament that resembled a wrapped gift. Just look what else you can do using some felt, embroidery floss, ribbon, and a few of the same hand-stitches:

Creative Deviations
How about a cute Santa belt? Just slit a piece of black ribbon and thread the gold ribbon through it!

Keeping your skills sharp – Here is another example of the gift card holder featured above using a different shape:
Simply get one of your favorite little people and trace around their hand like a mitten. Use this drawing as a template.


The mitten and cuff (Cut 2).

Simple adornment: Wreath. (Cut 1)
Pin the wreath (looks like a large “o”) on the top layer of the mitten, secure it with a blanket stitch or a simple running stitch, and add French Knots to simulate holly berries. Then, use the blanket stitch to secure the two mitten shapes together. Be sure to leave the top open for the gift card by only blanket stitching through the top layer along the cuff.
Here it is!

Add some large dots for berries with a couple of leaf shapes and you have this sweet little holly berry mitten gift card holder:

Let’s go cuff-less!
I simply cannot forget the snowman! I just overlapped two paper circles, one smaller than the other, and taped them together. Then, I pinned them to the felt and cut around the perimeter. Again, just blanket stitching and French Knots!

Have fun with your own creative deviations! You CAN Sew!
Warmly,
Jen & Dee
We’ve joined the following hops to share our ideas this week: (Please visit one, or all, of these great sites for countless free project ideas and inspiration! If you are visiting from one of these great sites, thank you for coming!Your comments are truly appreciated.)
MONDAY:
TUESDAY:
WEDNESDAY:
THURSDAY:
FRIDAY:
SATURDAY:
Visit us online for other great projects and products!
DIY Gift Card Holder
DIY Gift Card Holder/Ornament
Tutorial and BOGO Offer
We decided to bring our blog to you along with a special Black Friday BOGO offer! First, a fun tutorial the way we present them on the blog; and next, an unbeatable offer exclusively from Modesty Matters!
Sometimes finding the perfect gift for that special someone can be difficult. One thing that never gets old or goes out of style is gift cards. I know what you’re thinking….boring. Right? Not when you add some of your personalized handiwork to the presentation. You can make a very simple, yet touching (because you took the time to make it yourself with them in mind – scroll down to the bottom to see other great options) gift card holder that can double as an ornament or be re-used by the recipient to present a similar gift to another person. These are great for Christmas, Chanukah, birthdays, a thank you, a teacher appreciation gift, rewards – pretty much any occasion that calls for a gift. The options are limitless. Choose colors appropriate for the celebration, or the recipient’s favorite color.

Materials:
- 1-8½ X 11″ piece of felt for the main color
- 1-8½ X 11″ piece of felt for the accent color
- Embroidery Floss
- Embroidery Hand Sewing Needle
- 6-8 inches of ⅜” Grosgrain ribbon
- Liquid Seam Sealant or a Lighter
- Sharp Scissors
- Pins
Instructions:
Cut two 3″ X 4″ rectangles from the main color.
Cut ½” wide strip the length of the piece of felt (using the longer side) from the accent color.
Place the strip vertically centered on one of the rectangles. Align the top edge of your rectangle with the top edge of the accent strip. Pin this piece in place. Trim off the excess.
Thread your embroidery needle with about 18 inches of all 6 strands of embroidery floss. (Embroidery floss is actually 6 strands of thread twisted together to make a thicker piece.) Knot off the end. Coming in from the under side, tack the middle of this vertical strip in place with a single stitch. Leave this as is – without knotting off the single stitch – while you place the left-over piece of felt from before.

Carefully make a knot with the left-over piece of felt. (Avoid pulling or tugging too hard on the felt as it may separate.) Place this knotted piece in the center horizontally and pin it in place (optional). I simply eyeballed the area that would be covered by this strip.
Back to the embroidery needle and thread: Creating a French Knot
Choose a random place to come up from the under side. Once you’ve pulled the thread through, hold the thread with your free hand, and use the needle to pull the floss, near the felt, towards you. Wrap the needle three times with the floss.

Now take the needle and insert it into the felt immediately next to the place where it came out of the felt. Use your free hand to keep the wrapped thread touching the felt as you pull the needle back through.

Pull the needle and the length of thread all of the way through while holding the wrapped thread. Gently pull until taught.

This is basically what your knot should look like from the top side.

Now, choose a few other random places to repeat this process until you are happy with the decoration you have created.

Now, we’re ready to secure the front piece that we’ve pinned and decorated to the back piece. Layer the two rectangles and re-insert the pins through all layers.
Back to the embroidery needle and thread: Creating a Blanket Stitch
The blanket stitch is often used to bind the edge of a piece of fabric that will not unravel, in a decorative fashion.
This time, separate the strands of embroidery floss so that you are only using two strands for this set of stitches. Knot off the end, and then insert the needle from the back side of the front rectangle about ¼ inch from the edge.

Pull the thread through to the knot and then insert the needle ¼ inch away vertically through both layers of felt.

Do not pull this all the way through. Leave a small loop. Take the needle and come up from the back side through that open loop and tighten.

Then, repeat this process all of the way around the piece.

Inserting the Grosgrain Ribbon: Before you reach the corner, seal the ends of your ribbon with either a quick pass of a lighter (which melts the fibers together) or with liquid seam sealant. Pin the ribbon between the layers, and incorporate it into your blanket stitch as just another layer to pierce with the needle.

REMEMBER TO ONLY STITCH THE DECORATIVE LAYER (not through both layers) ALONG THE TOP. (We need that opening in order to insert the gift card.)
Knot it off at the end, and try to conceal this knot between the layers.
You did it! Good work!
You CAN Sew!

Would you like more gift-giving ideas?
CHECK OUT OUR BOGO OFFER BELOW!
Please visit us online for our Black Friday BOGO on
and
SAVE $24.95!
Keep them both for yourself and make your gifts this year, or give the gift of skill by sharing one of your copies with a friend or loved one. Just add one of these two titles to your cart and we’ll automatically send you the other title for FREE! (This offer is valid NOW through November 25, 2011)


Do you ever struggle with what to get that special someone, or how to wrap it? Are you unsure of how to show them that you care without spending a small fortune? The solution is here! “You CAN Sew: Gifts for Him” and “You CAN Sew: Gifts for Her” offers many simple, do-able suggestions for handmade gifts from the heart. All you need is a sewing machine, thread, scissors, and some fabric, one or both of these reusable DVD sets, and you are on your way! These step-by-step DVD sets alone are also great gifts for loved ones who enjoy working with their hands.
“You CAN Sew: Gifts for Him” includes the following titles:
- The Grill Apron
- The Grill Mitt
- A Handsome Gift Bag
- A Handy Nail Apron
- Leisure Pants (with a pocket)
“You CAN Sew: Gifts for Her” includes the following titles:
- The Decorative Pillowcase
- Drawer Sachet
- Flattering Kitchen Apron
- Drawstring Satchel
- Gusseted Gift Bag with French Seams
When you really care about someone, you want them to feel loved. Showing them by using your skills to create something, with just them in mind, is a great place to begin. Just knowing that they were worth your time and energy is sure to please even the pickiest of folks! Get ready for the heartfelt, ear-to-ear grins you’ll be getting because You CAN Sew!
Warmly,
Jen & Dee
Start taking advantage of this special offer now!
Thank you for supporting Small Business Success!
We’ve joined the following hops to share our ideas this week: (Please visit one, or all, of these great sites for countless free project ideas and inspiration! If you are visiting from one of these great sites, thank you for coming!Your comments are truly appreciated.)
MONDAY:
TUESDAY:
WEDNESDAY:
THURSDAY:
FRIDAY:
SATURDAY:
Visit us online for other great projects and products!
DIY Snuggle Pet Bed
DIY Snuggle Pet Bed
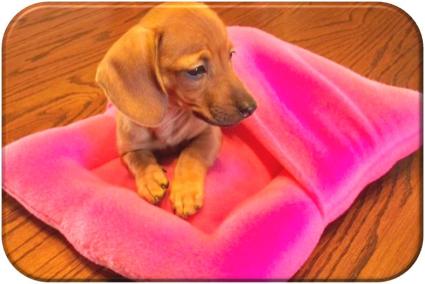
Isn’t Ginger adorable?!
It’s getting colder! Our beloved pets sometimes need help getting the extra warmth they need – especially puppies and kittens. We can just go put on a sweater or sweatshirt, but they are at our mercy. Giving them a special bed with a snuggle blanket affixed to it is an awesome way to provide for them. This will be their new favorite place when you are not available to love on them and keep them warm with your body heat. This is a very simple, yet effective and adorable, project. You CAN Sew!
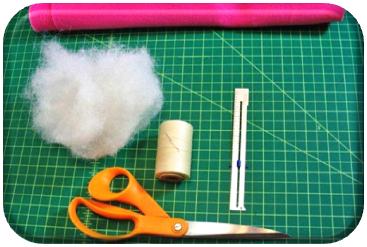
You will need:
- About a yard of no-pill fleece
- Sharp Scissors
- Matching thread
- A Hand Sewing Needle
- Sewing Machine
- A Hem Ruler
- Polyester Batting/Stuffing
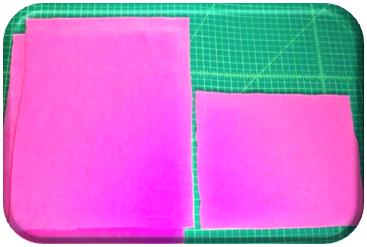
Cut two pieces of fleece fabric 2 inches larger than you would like the finished project to be. For a large animal, your measurements will be vastly different than those for a small animal as pictured above. For a larger animal, add 3+ inches to the WIDTH of the smaller piece.
Cut one (1) more piece of fleece ⅔ the size of the first two pieces. So, you’ll have three (3) pieces total.
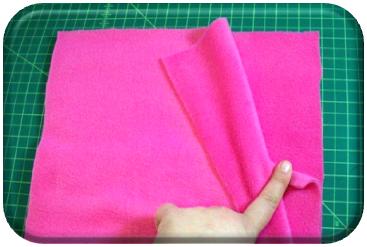
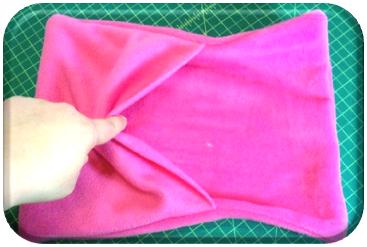
Sandwich the three layers, with the smaller piece in the middle of the two larger pieces. Keep the three sides (side–bottom–side) aligned with each other for all three pieces. (If you are making an XL sized bed, you’ll have to fold the middle piece at the base, making two pleats, in order to sew this sandwich together while keeping the edges aligned.)
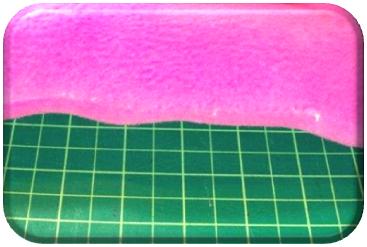
For an XL bed, the middle (smaller) layer will look like this at the base:

So, the TOP | MIDDLE | BOTTOM sandwich looks like this for an XL size:
Straight stitch all the way around the edges of your project using a ⅝ inch seam allowance. Leave a 4 inch opening at the top (the side opposite the shorter piece of fleece) so we can turn the piece right sides out.
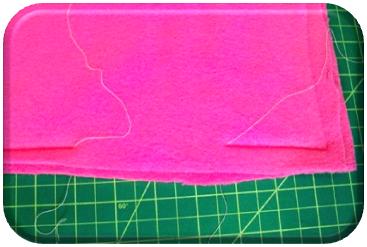
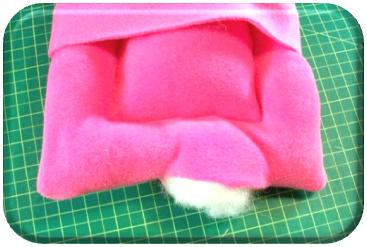
Now, turn the piece right sides out. We don’t have to worry about the unfinished edge of the shorter piece because fleece won’t unravel! This is what it should look like so far:
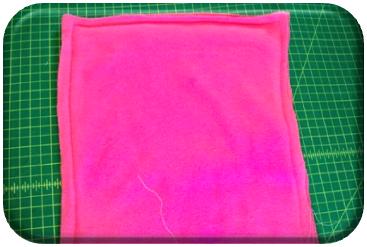
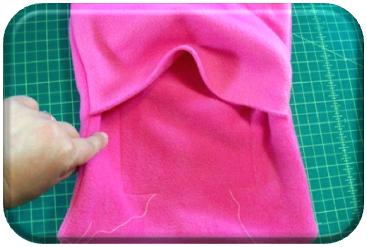
Next, pull back the flap/pocket and sew a straight stitch 3 to 5 inches from the edge all the way around your piece (depending on how large the bed [and the pet] is going to be – the larger the bed/pet, the larger the distance from the outer edge). Be sure this seam is inside the pocket And be sure to leave an opening to stuff the inside area.
Stuff the inner pillow.
Stitch the inner pillow closed.
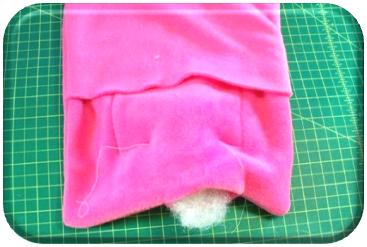
Taking small pieces of stuffing at a time, stuff the outer pillow tunnel all the way around. Be sure to push the stuffing into the corners.
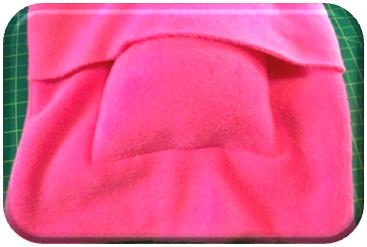
Hand whipstitch the outer pillow closed. This is exactly the same stitch we used in the DIY Hide-A-Way Pillow.
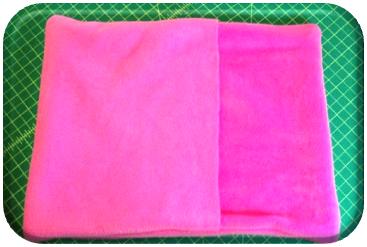
Here we are. You did it! What a great little Snuggle Pet Bed.
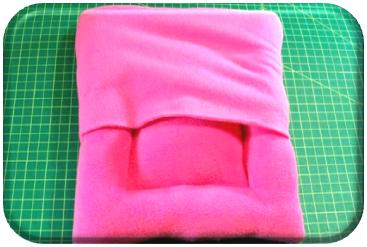
Enjoy!
~Dee
***Click HERE for a PRINTABLE version.
We’ve joined the following hops to share our ideas this week: (Please visit one, or all, of these great sites for countless free project ideas and inspiration! If you are visiting from one of these great sites, thank you for coming! Your comments are truly appreciated.)
MONDAY:
TUESDAY:
WEDNESDAY:
FRIDAY:
SATURDAY:
Visit us online for other great projects and products!
DIY Hide-A-Way Pillow
DIY Hide-A-Way Pillow

As moms, we are constantly trying to find things to keep our little ones happily (& quietly) occupied in the car, at sporting events, gatherings, in the grocery store, and at church. This simple little pillow (yes, simple!) combines activity, storage, and comfort all in one great, straightforward project. It is a pillow for rest and comfort, and a secure storage pocket for crayons & a coloring book, a favorite toy or book, a video game…you name it! The options are endless. Let’s sew!
Items needed:
- 4 – 20 X 20 pieces of fabric of like composition (all flannel, all knit [use a stretch needle on your machine], or all cotton broadcloth…if you choose fleece for the outer 2 layers, you may want to go with something less bulky on the inside like flannel or cotton calico)
- Sharp Scissors
- Fabric Pencil or Evaporating Marker
- An 12″ Zipper (not invisible)
- A Hand Sewing Needle (ball-point for knits)
- Coordinating Thread
- Pins
- Machine (Straight Stitch and Zigzag Stitch)
- Poly-Cotton Batting/Stuffing

Cut all pieces in any shape that you want your pillow to be. We chose a square for simplicity. Be sure to cut a total of 4 pieces, two for the inner (hidden) pocket and 2 for the outer pillow.

Stay stitch (long, machine basting stitch using 3-5 spi) along the upper side (choose which of the four sides will be your “upper” side) and zigzag stitch along the same edge to prevent fraying.

Center the zipper along upper edges that you just zigzagged and mark. Return to the machine and straight stitch at 5/8″ seam allowance from each mark to the outer corner. Then, press that seam open.


Baste the opening closed by hand. This will assist you in properly lining up, and sewing in, the other side of the zipper. (These stitches will be removed later, so don’t worry about whether or not they look pretty.)

Place zipper on the basted-closed opening. Pin in place.

Straight stitch (5-8 spi) the zipper in place overtop of the basted opening. Remove the basting stitches.

Pin the remaining three sides together.
(Right now, you have 4 layers of fabric sewn together with a zipper at the top: inner | outer | outer | inner, and three open sides.)

Straight stitch at 5/8″ seam allowance, beginning at upper right corner, pivot (raise your presser foot with your needle down, turn the piece, then lower the presser foot) and stitch part way across the bottom. Lock your seam (backstitch, or sew in reverse, at the end of the seam just a few stitches). Leave a 5 to 7 inch opening to stuff your pillow, and begin your seam again. Pivot at the corner, and straight stitch up the other side to the end corner.

Zigzag Stitch along those same three edges to finish the seams and keep them from fraying.

Turn the pillow right sides out, fold in the edge to match the existing seam allowance, and whipstitch the inner pocket closed by hand. Add Stuffing between the sewn pocket and the outer layers on both sides.

Just like you whipstitched the inner layers of the pocket together, whipstitch the outer two layers of the pillow closed as well.
You DID it! Here is the finished Hide-A-Way Pillow showing the zippered pocket.

Here is the finished pillow with a few toys peeking out.

Here is the finished pillow, with the toys concealed in the Hide-A-Way pocket.

This is a great travel anywhere accessory! Want to modify it? Go ahead – Have fun with it! I could see this on a smaller scale being a fantastic tooth fairy pillow!!!! (I know an adorable little boy with matching PJ pants who might just use it for a frog or two! {Let’s hope not!} LOL!) What might you use this fun storage pillow to hide?
***Click HERE for a PRINTABLE version!
We’ve joined the following hops to share our ideas this week: (Please visit one, or all, of these great sites for countless free project ideas and inspiration! If you are visiting from one of these great sites, thank you for coming! Your comments are truly appreciated.)
MONDAY:
TUESDAY:
WEDNESDAY:
THURSDAY:

FRIDAY:
SATURDAY:
Visit us online for other great projects and products!