Posts filed under ‘Matters of Modesty’
DIY Bra Strap Concealer
The Problem: Peek-A-Boo Bra Straps
The Solution: A Simple, Sew-In, Snap Guide
We all have a shirt or two that we LOVE, but every time we wear it, our bra strap ends up playing peek-a-boo. It’s frustrating, annoying, and even embarrassing. We have to be on guard, paying attention to our every move so that should the shirt slip a little, we don’t end up showing a lot. You know what I mean…and it always happens at the most inconvenient time, too.
Materials:
• Grosgrain Ribbon, ¼“ to ⅜” Wide
• 2 Sew-in Snap Sets
• Machine, or Needle & Matching Thread (matching your shirt color)
• Marking Pen (Evaporating)/Pencil/Taylor’s Chalk
Instructions:
1. Put “that” shirt on.
2. Look in the mirror. Adjust the shirt so that it is sitting correctly on your shoulders. Nothing peeking.
3. Mark the shoulder seam, where your bra strap is sitting, on both sides of the strap. Both Shoulders.
4. Transfer these marks to the inside of the shirt/shoulder seam for later reference. (I find holding the shirt up to the window is hugely helpful in seeing the marks, and then the glass becomes a solid surface to support the marking of the space.)
5. Measure the distance between the marks on each shoulder…they should be the same. (Although, remember that not all bra straps are the same width. Some are thick, some are thin, and some are padded. All of mine are the same because I have a particular bra style that I love for comfort and support, but yours may be different and you might need to make appropriate accommodations.)
6. Double that measurement and add ½” for the length of the grosgrain ribbon. Do this twice, one for each shoulder. (You’ll only sew on half of this length of ribbon though, so that the other half can be free to wrap around your bra strap and then be snapped in place.)
7. Melt the ends of the ribbon(s) with a quick pass of a lighter.
8. On one side/face of the ribbon, sew on the snap parts near the lateral ends.
9. Sew-in the ribbon between the lines you drew on each shoulder, making sure to “lock” the beginning and end of this short, centered seam. (Locking” the seam means to move forward a couple of stitches, and then go in reverse a couple of stitches, and then move forward again.) This seam can be “hidden” in the existing shoulder seam, but make sure to use thread matching the color of your shirt just in case your seam line isn’t so straight. 😉
RIGHT SHOULDER: (inside-back of the shirt is facing you)
LEFT SHOULDER: (inside-back of the shirt is facing you)
So, here is what we have:

10. The floppy, unattached ends now are ready to go under your bra strap on each side, and snap in place. No more Peek-A-Boo! Problem solved!
DIY Tiered Skirt

The Triple Tiered Twirly Skirt
The Triple Tiered Twirly Skirt
You are not going to believe how simple this is!
Perfect for everyday, this popular children’s (and adult’s) skirt style is literally three rectangles, gathered and sewn together.
Based on my 9YO daughter, this is what I did:

Fabric:
100% Cotton Calico, 2 Coordinating Prints, 1 yard (red) and ½ yard (blue)
Length:
I measured from her waist down to the length where I wanted the skirt’s hem to land.
I took that length, and divided it by 3 (b/c I was making the skirt have 3 tiers). This answer is now the base length (B) for each tier.
I added 2″ inches to the first, uppermost tier, so that I could make a casing for the elastic (¾” no-roll elastic), include seam allowance, and not interfere with the overall length.
The second tier and third tiers needed 1 ¼” added to the lengths for standard ⅝” seam allowances.
Basic Width: (WOF means Width Of Fabric, from Selvage to Selvage)
(A) Top Tier = WOF
(C) Middle Tier* = WOF + ½ WOF
(D) Bottom Tier = WOF X 2
(E) {Bottom Tier for Teen/Adult = WOF X 3}
Optional SUPER Twirly Width:
(A) Top Tier = WOF
(C) Middle Tier* = WOF X 2
(D) Bottom Tier = WOF X 3
(E) {Bottom Tier for Teen/Adult = WOF X 4}
Sew the individual tiers together to make long rectangles for the 2nd and 3rd tiers, where additional width is required.
Sew each tier’s short sides together, creating a loop.
Then, finish these tiers with a tiny rolled hem (awesome if you have a serger for this) along both long sides of each tier.

For the top tier: Create a 1″ casing for your elastic along the top and insert the elastic, and create a tiny rolled hem along the bottom.
Next, use a marking pencil or chalk to mark ⅝ inch (all the way around) measured up from the bottom of the 1st and 2nd tiers. You will use this line for placement of subsequent tiers.
Using a running stitch, gather the top of the second tier, evenly disperse it, and sew it on top of the 1st tier using your line that you drew as a placement guide.

Using a running stitch, gather the top of the 3rd tier, evenly disperse it, and sew it on top of the 2nd tier using your line that you drew as a placement guide.

Ta-Da! Simple, right?
Notes: *An Adult Size Would Begin HERE as the Top Tier. (E) would also be used.
Printable PDF: Click HERE.
DIY Skirt Slit Repair
{YAY! We’re back! We’ve missed you.}
DIY Skirt Slit Repair
(This particular remedy works best when you have a straight slit that does not overlap.)
#1: If you ever wear skirts, you’ve had it happen: The dreaded skirt slit rip! Well, today I am going to remedy this once and for all, and you CAN too. Shame on any rip that gets by THIS fix!!

#2: You will need a scrap of fabric to at least coordinate with the skirt you intend to fix. I am fixing a jean skirt here so I have an old scrap or denim.

#3: Before we can patch and prevent future rips we need to mend the current rip as best we can. The best way is to decrease the side seam just slightly in order to hide the rip in the seam. All this means is that you are going to start a little bit higher than the rip, at the existing seam, and stitch as if you were reinforcing the seam but allowing the seam allowance to become more wide (further into the fabric) as you go until you have passed the rip. (Remember to LOCK the beginning and ending of the seam.)

#4: Roll the existing slit’s hem a little bit past where it is currently. Do this in a graded
fashion
(more at the bottom and gradually less and less until there is nothing left to change and the adjustment effortlessly runs into the manufactured seam) so that the existing seam will be minimally affected. Press it, pin it, and stitch it in place.
Top stitch (as shown below) to frame the new slit.

#5: Prepare the patch. Since I am using denim I am going to both zigzag and add a line of straight stitch inside of that to prevent fraying. If you are using material that is not as prone to fray the zigzag is likely sufficient.

#6: Pin the patch to the inside of the skirt at the top of the slit as shown.

#7: Stitch the patch to the skirt in a reinforced box pattern.

#8: Here it is from the outside.

#9: Here it is — The very sturdy, finished product!

Join us in an upcoming blog to learn how to fill in skirt slits that are too revealing while still leaving room to walk!
***Click HERE for a PRINTABLE version.
We’ve joined some, or all, of the following hops to share our ideas this week: (Please visit one, or all, of these great sites for countless free project ideas and inspiration! If you are visiting from one of these great sites, thank you for coming!Your comments are truly appreciated.)
MONDAY:


TUESDAY:


WEDNESDAY:


THURSDAY:


FRIDAY:


SATURDAY:


Visit us online for other great projects and products!
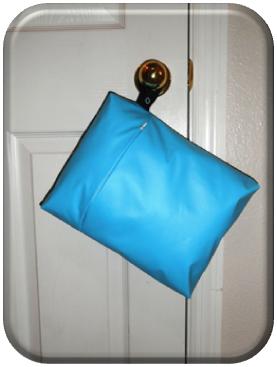
DIY Wet Bag
DIY Wet Bag
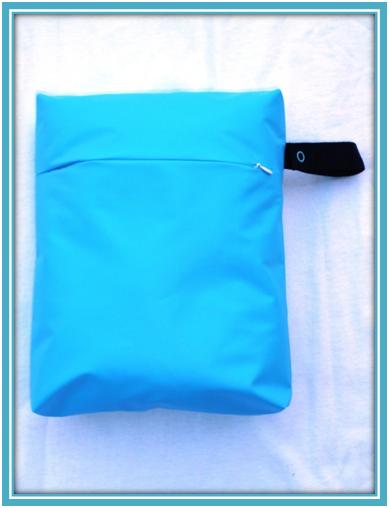
If you are into cloth diapers and/or cloth momma pads for the sole purpose of being more green, or simply more healthy, then this wet bag is for you! Even if it has nothing to do with being green, this wet bag may be right for you. It is re-useable, so it creates less waste. It is customizable, so it can be very personalized. It’s portable, so it can travel wherever you go. It can hang on the bathroom door knob (or any door knob) for convenience without creating an eyesore.
I personally use it when I travel in order to keep my unmentionables unseen. It is a great dirty laundry bag for those items you don’t really want others seeing…and, it is washable!
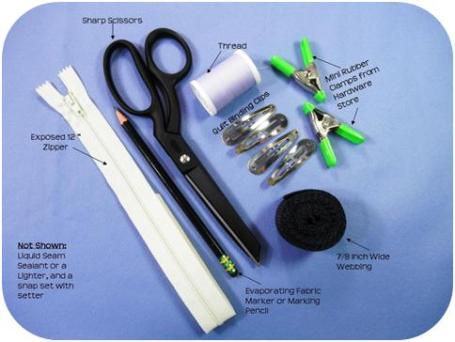
Materials:
- 28″ X 12″ Piece of water proof or water resistant fabric like PUL (left) or ProCare Barrier Fabric (right)
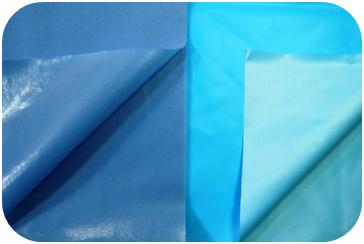
PUL (LEFT – Purple) is a vinyl (shiny) backed fabric that is soft to the touch. It feels a lot like flannel on the “right side.” PUL is lighter or less thick/dense than ProCare Barrier fabric. ProCare (RIGHT – Aqua) is similar to a durable vinyl tablecloth with the exception of the backing being some sort of affixed woven mesh with a matte finish. PUL is commonly used in cloth diapers and diaper covers, both infant and adult. ProCare is hospital grade, non-woven, waterproof fabric.
- 7-9″ Exposed Zipper
- A Zipper foot and a Teflon (non-stick) Universal Foot for your Machine
- 8-9″ Long Piece of ⅞” Wide Webbing
- 1 Complete Snap Set
- 8-10 Quilt Binding Clips or Rubberized Mini Clamps from a Hardware Store (No Pins b/c we don’t want to create holes for liquid to sneak through.)
- Thread
- Marking Pencil
- Sharp Scissors
- Sewing Machine
Instructions:
Remove the selvages from the piece of fabric.
ZIPPER: The two shorter edges will be where the zipper goes, so lay the piece of fabric in front of you in a tube shape with that opening between the two shorter edges facing up. You should be looking at the “right” side of the fabric which is the side you want to see when the project is finished.
Lay the zipper, centered, on one side of the opening. Mark where it begins and ends.
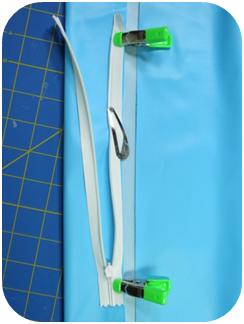
Placing right sides together, sew a straight stitch using a 5/8 inch seam allowance from your mark to the nearest edge on both sides. Remember to lock your seams.
(If you are using an invisible zipper, now is the time to press it open. Zipper instructions are always included with the zipper when purchased – it’s part of the packaging.)
Place your zipper back in the center and secure it. Keep in mind how you want the finished product to look and work. Doing so will help you make sure you get the zipper in the correct way.
Notice above, the front of the zipper is facing the “right” side of the fabric and the whole zipper is moved over to the right hand side. Using the appropriate zipper foot, sew this side in place. Zip up the zipper and secure it in place on the other side of the fabric.

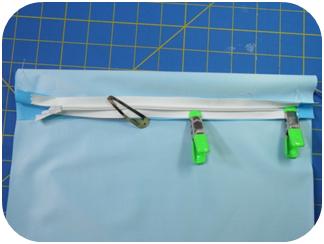
Now, sew this side of the zipper in place.
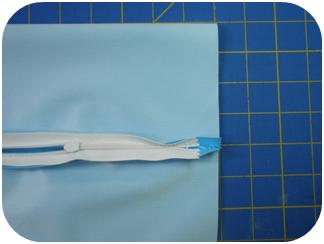
You should currently have a tube with a zipper inserted. Flatten out this tube and roll the zipper over the top by about four inches so that the zipper will be on the front of the bag, rather than the top.
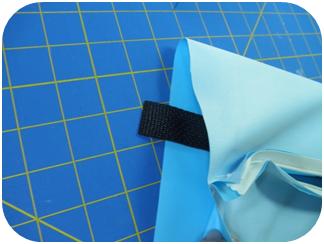
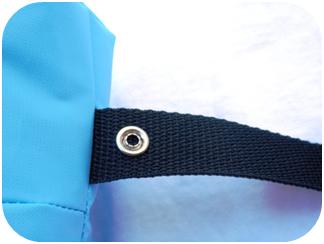
WEBBING: Fuse the ends of the webbing, either by melting them or by sealing them. Decide on the placement of your webbing, and tuck it inside the tube aligning its edge with the raw edge/side seam of the bag. I like it on the side of the zipper when it is completely closed, so I placed mine just above the seam on that side. (I made it stick out so you could see it.)
Straight stitch, using your Teflon* universal foot, down the right side of the bag using a ⅝” seam allowance. Remember to lock your seams. Unzip your zipper, and straight stitch down the left side. Again, lock your seams. Now, we’re ready to add gussets!
*If you do not have a Teflon foot for your machine, you can use a piece of cellophane gift wrap tape on the bottom side of your regular universal foot. Remember not to cover the area where the needle will penetrate the fabric. Keep that slit or hole free of tape so as to not gunk up your needle.
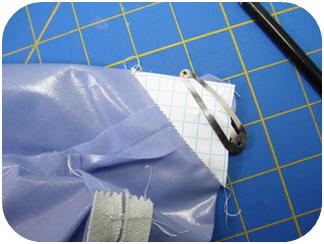
GUSSETS: Gussets increase the amount of useable space in a bag like this, and they are so simple to incorporate! There are several ways to do this. One way is to measure and mark as we did with the Zippered Pouch, and another it to create and use a template as such:
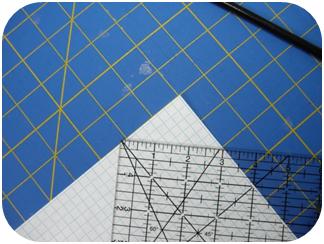
I wanted my gussets to be 3″ deep, so I measured a triangle from the corner of a piece of grid paper (any paper will do). I lined up the paper with the grid lines on my cutting board. When the measurement reached 3″ across the triangle’s base as shown above, I drew a line, and cut off the triangle. Of course, you’ll need to make sure the sides of this right triangle measure the same length too – hence, my grid. =) For you wonderful math people out there, just use the algorithm a2 + b2 = c2.
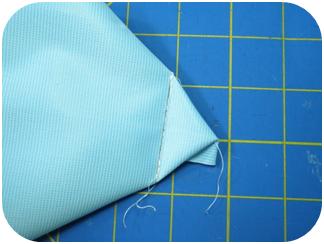
Roll the side seam at the corner until the seam itself is centered in the triangle. Secure the template. Straight stitch across the long edge of the triangle. Lock the beginning and ending of this seam. Repeat this procedure on the other three corners.
You can trim the fabric triangles off leaving ¼” to ⅝” seam allowance, if you want to.

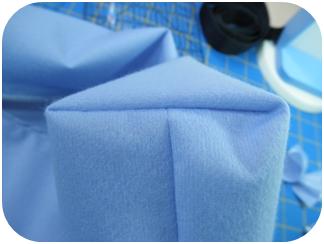
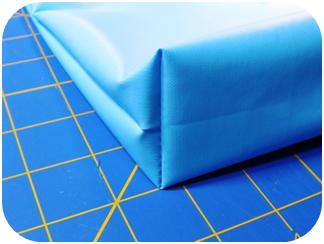
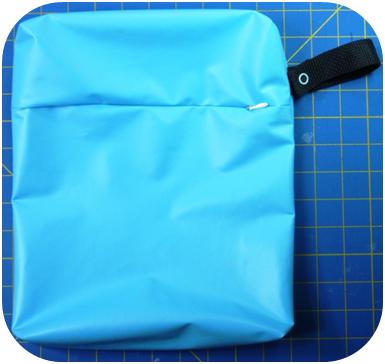
Turn the bag right sides out and admire your handiwork. Not only have you inserted a functional zipper, but you’ve made gussets as well! Good job!
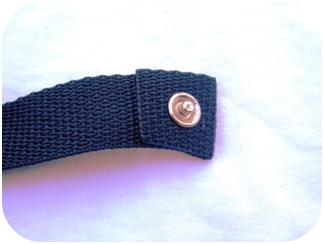
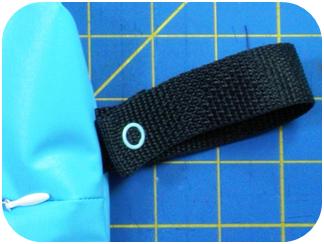
SNAPS: The final step is to place your snaps (according to your snap setter … there are several different kinds) on the webbing to create a loop for holding or hanging the bag. Fold over the far end of the webbing by about an inch and affix the one side of the snap set. Then, fold that piece over toward the bag in order to place the other half of the snap set where you want it to be for a good fit.
Ta-Da!
You CAN Sew!
***Click HERE for a PRINTABLE version.
We’ve joined the following hops to share our ideas this week: (Please visit one, or all, of these great sites for countless free project ideas and inspiration! If you are visiting from one of these great sites, thank you for coming!Your comments are truly appreciated.)
MONDAY:


TUESDAY:


WEDNESDAY:


THURSDAY:

FRIDAY:
SATURDAY:
Visit us online for other great projects and products!
Modesty T-Shirt Panel
I love wearing v-neck t-shirts! There’s just something about not having my neck encroached upon by a collar that pleases me. I don’t like anything around my neck…I don’t know why, I just don’t. So, v-necks are awesome – most of the time. On the occasion that I have a shirt with which I love the fit, but the “V” is too low, I simply make one of these quick & functional “modesty panels.” It can be sewn directly to the shirt following existing seam lines, or it can be made interchangeable by attaching it with some sew-on snaps (this type tends to be less bulky and more easily hidden). If you have one or two v-neck shirts, you might just want to sew the panel straight in. If you have a ton of v-necks like me, you might want to make a few panels with snaps, so that they can be used a few times with different shirts before washing.

There are so many ways to accomplish this type of a modesty panel. It could be made to attach to your bras, to be interchangeable with your shirts, or to be sewn in. The pattern provided is NOT a one-size-fits-all, but rather a guide for you to trim or adjust to the appropriate proportions as determined by your shirt (or bra) size and style. For the purpose of this tutorial, I am going to make one that is interchangeable with snaps.
All you need to do is cut the panel out on the fold. This means, from the edge that was cut at the store, fold a single layer of your fabric down far enough to fit the pattern.


Pin, then cut out the pattern.
Fold the piece in half the way it will appear when worn. Iron with right sides out.

Pin to keep the fabric from shifting.

Sew a straight stitch across the top ¼” from the fold.

Zigzag stitch around the three remaining raw edges.

Snip the corners.

Hand-sew the snaps to the panel like you would a button. Use doubled thread, knotted at the end, and loop through each hole in the snap’s perimeter at least three times.

Lay it on your inside-out shirt to determine correct placement for the other half of the 4 snaps. (Decide how high up, or how low, you’d like the panel to be.) Sew them in place.
Done!

***Click HERE for the PRINTABLE version.
This week, I’m linking up with:
MONDAY:

TUESDAY:


WEDNESDAY:
THURSDAY:

FRIDAY:


SATURDAY:

Friday Blog Hop

Welcome to all of the new visitors from Home Grown Families and Mama to 4 Blessings! This is my first time participating in the blog hop. I blog about modesty (but I don’t try to define it for you), sewing, patterns that we’ve made or like, random loved recipes, occasional musings, product reviews (usually curriculum), homeschooling and our business, Modesty Matters. Our business is unique because we teach you how to make each project we sew using a step-by-step video on DVD. We literally sew right along with you. The exclusive pattern(s) and instructions come on a printable (& re-printable) PC and MAC friendly CD.
Today, I want to share our swim dresses with you.

Empire Waist Swim Dress (2-Piece)
*Empire Waist Swim Dress (2-Piece): Hem it as long, or as short as you want. This high-waisted, short-sleeved dress has slightly more flair to the skirt than the standard style. Also a very flattering style with slimming darts in the bodice, this dress is great for most figure types…particularly those who are a little more “fluffy” than others. This dress is absolutely adorable on pre-teens and younger.
*Standard Swim Dress (2-Piece): Hem it as long, or as short as you want. This short-sleeved dress’s skirt silhouette is narrower at the top, gently flaring wider toward the bottom thereby resembling the letter A. This style works well on most figure types, especially with the flattering darts in the bodice, and is typically preferred by pre-teens and older.
*BOTH of these 2-piece styles now come in ONE DVD/CD pattern set! Choose either ALL adult sizes, or ALL children’s sizes. So much more bang for your buck! Click HERE to BUY NOW.
OPTIONAL: We will make these for you!
If you are like my sister with her glue gun and stapler, you might be intimidated by the pattern and sewing process…so, let us do the work for you! Children’s sizes are only $35 + $5 s/h. Adult sizes are just $45 +$5 s/h! Just email us with your size and/or measurements.