Posts filed under ‘Girly / For Girls’
DIY Bra Strap Concealer
The Problem: Peek-A-Boo Bra Straps
The Solution: A Simple, Sew-In, Snap Guide
We all have a shirt or two that we LOVE, but every time we wear it, our bra strap ends up playing peek-a-boo. It’s frustrating, annoying, and even embarrassing. We have to be on guard, paying attention to our every move so that should the shirt slip a little, we don’t end up showing a lot. You know what I mean…and it always happens at the most inconvenient time, too.
Materials:
• Grosgrain Ribbon, ¼“ to ⅜” Wide
• 2 Sew-in Snap Sets
• Machine, or Needle & Matching Thread (matching your shirt color)
• Marking Pen (Evaporating)/Pencil/Taylor’s Chalk
Instructions:
1. Put “that” shirt on.
2. Look in the mirror. Adjust the shirt so that it is sitting correctly on your shoulders. Nothing peeking.
3. Mark the shoulder seam, where your bra strap is sitting, on both sides of the strap. Both Shoulders.
4. Transfer these marks to the inside of the shirt/shoulder seam for later reference. (I find holding the shirt up to the window is hugely helpful in seeing the marks, and then the glass becomes a solid surface to support the marking of the space.)
5. Measure the distance between the marks on each shoulder…they should be the same. (Although, remember that not all bra straps are the same width. Some are thick, some are thin, and some are padded. All of mine are the same because I have a particular bra style that I love for comfort and support, but yours may be different and you might need to make appropriate accommodations.)
6. Double that measurement and add ½” for the length of the grosgrain ribbon. Do this twice, one for each shoulder. (You’ll only sew on half of this length of ribbon though, so that the other half can be free to wrap around your bra strap and then be snapped in place.)
7. Melt the ends of the ribbon(s) with a quick pass of a lighter.
8. On one side/face of the ribbon, sew on the snap parts near the lateral ends.
9. Sew-in the ribbon between the lines you drew on each shoulder, making sure to “lock” the beginning and end of this short, centered seam. (Locking” the seam means to move forward a couple of stitches, and then go in reverse a couple of stitches, and then move forward again.) This seam can be “hidden” in the existing shoulder seam, but make sure to use thread matching the color of your shirt just in case your seam line isn’t so straight. 😉
RIGHT SHOULDER: (inside-back of the shirt is facing you)
LEFT SHOULDER: (inside-back of the shirt is facing you)
So, here is what we have:

10. The floppy, unattached ends now are ready to go under your bra strap on each side, and snap in place. No more Peek-A-Boo! Problem solved!
DIY Tiered Skirt

The Triple Tiered Twirly Skirt
The Triple Tiered Twirly Skirt
You are not going to believe how simple this is!
Perfect for everyday, this popular children’s (and adult’s) skirt style is literally three rectangles, gathered and sewn together.
Based on my 9YO daughter, this is what I did:

Fabric:
100% Cotton Calico, 2 Coordinating Prints, 1 yard (red) and ½ yard (blue)
Length:
I measured from her waist down to the length where I wanted the skirt’s hem to land.
I took that length, and divided it by 3 (b/c I was making the skirt have 3 tiers). This answer is now the base length (B) for each tier.
I added 2″ inches to the first, uppermost tier, so that I could make a casing for the elastic (¾” no-roll elastic), include seam allowance, and not interfere with the overall length.
The second tier and third tiers needed 1 ¼” added to the lengths for standard ⅝” seam allowances.
Basic Width: (WOF means Width Of Fabric, from Selvage to Selvage)
(A) Top Tier = WOF
(C) Middle Tier* = WOF + ½ WOF
(D) Bottom Tier = WOF X 2
(E) {Bottom Tier for Teen/Adult = WOF X 3}
Optional SUPER Twirly Width:
(A) Top Tier = WOF
(C) Middle Tier* = WOF X 2
(D) Bottom Tier = WOF X 3
(E) {Bottom Tier for Teen/Adult = WOF X 4}
Sew the individual tiers together to make long rectangles for the 2nd and 3rd tiers, where additional width is required.
Sew each tier’s short sides together, creating a loop.
Then, finish these tiers with a tiny rolled hem (awesome if you have a serger for this) along both long sides of each tier.

For the top tier: Create a 1″ casing for your elastic along the top and insert the elastic, and create a tiny rolled hem along the bottom.
Next, use a marking pencil or chalk to mark ⅝ inch (all the way around) measured up from the bottom of the 1st and 2nd tiers. You will use this line for placement of subsequent tiers.
Using a running stitch, gather the top of the second tier, evenly disperse it, and sew it on top of the 1st tier using your line that you drew as a placement guide.

Using a running stitch, gather the top of the 3rd tier, evenly disperse it, and sew it on top of the 2nd tier using your line that you drew as a placement guide.

Ta-Da! Simple, right?
Notes: *An Adult Size Would Begin HERE as the Top Tier. (E) would also be used.
Printable PDF: Click HERE.
DIY Overalls into OverSKIRT
(Just in case you missed our most recent email with an incredible deal on our curriculum, click HERE.)
Convert denim overalls that are too short into an overskirt using an old pair of jeans.

Things you will need:

- a pair of bibbed overalls
- a pair of jeans to cut the legs off of and “donate them” to the overalls
- scissors
- pins
- a sewing machine with a Denim Needle (a Universal Needle should work, too)
- Thread
I have just one suggestion: Try to use donor jean fabric that is the same approximate weight as the skirt. It is tempting to use just any old jeans you have lying around but the result is a stiff section of skirt that doesn’t drape or lay well.
- Seam rip (or frog-stitch) the inseam of the overalls.

- Lay the back seam over to one side.

- Clip to ¼ inch before the curve straightens.

- Lay cut flap down.

- Fold in raw edge of piece with seam, overlap over cut piece and pin.
- Stitch flap in place.

- Repeat steps 5, 6, & 7 on the front.


- Prepare the donor jeans by cutting the legs off at the approximate length needed to fill in the openings of both the front and the back of the future skirt.


- Fold under the raw edges of the skirt and pin the donor piece inside the opening. Straight stitch in place.

- Repeat on the back of the skirt. Trim off any excess fabric from the donor jeans. (BTW. The seam from the donor jeans does not have to be centered. It can be any way you want it.)

You did it!
We’ve joined some, or all, of the following hops to share our ideas this week: (Please visit one, or all, of these great sites for countless free project ideas and inspiration! If you are visiting from one of these great sites, thank you for coming!Your comments are truly appreciated.)
MONDAY:


TUESDAY:


WEDNESDAY:


THURSDAY:


FRIDAY:


SATURDAY:


Visit us online for other great projects and products!
Browse and Shop: www.modestymatters.net
Blog: modestymatters.wordpress.com
Facebook: www.facebook.com/YouCANSew
Twitter: www.twitter.com/Modesty_Matters
DIY Skirt Slit Repair
{YAY! We’re back! We’ve missed you.}
DIY Skirt Slit Repair
(This particular remedy works best when you have a straight slit that does not overlap.)
#1: If you ever wear skirts, you’ve had it happen: The dreaded skirt slit rip! Well, today I am going to remedy this once and for all, and you CAN too. Shame on any rip that gets by THIS fix!!

#2: You will need a scrap of fabric to at least coordinate with the skirt you intend to fix. I am fixing a jean skirt here so I have an old scrap or denim.

#3: Before we can patch and prevent future rips we need to mend the current rip as best we can. The best way is to decrease the side seam just slightly in order to hide the rip in the seam. All this means is that you are going to start a little bit higher than the rip, at the existing seam, and stitch as if you were reinforcing the seam but allowing the seam allowance to become more wide (further into the fabric) as you go until you have passed the rip. (Remember to LOCK the beginning and ending of the seam.)

#4: Roll the existing slit’s hem a little bit past where it is currently. Do this in a graded
fashion
(more at the bottom and gradually less and less until there is nothing left to change and the adjustment effortlessly runs into the manufactured seam) so that the existing seam will be minimally affected. Press it, pin it, and stitch it in place.
Top stitch (as shown below) to frame the new slit.

#5: Prepare the patch. Since I am using denim I am going to both zigzag and add a line of straight stitch inside of that to prevent fraying. If you are using material that is not as prone to fray the zigzag is likely sufficient.

#6: Pin the patch to the inside of the skirt at the top of the slit as shown.

#7: Stitch the patch to the skirt in a reinforced box pattern.

#8: Here it is from the outside.

#9: Here it is — The very sturdy, finished product!

Join us in an upcoming blog to learn how to fill in skirt slits that are too revealing while still leaving room to walk!
***Click HERE for a PRINTABLE version.
We’ve joined some, or all, of the following hops to share our ideas this week: (Please visit one, or all, of these great sites for countless free project ideas and inspiration! If you are visiting from one of these great sites, thank you for coming!Your comments are truly appreciated.)
MONDAY:
TUESDAY:

WEDNESDAY:
THURSDAY:

FRIDAY:
SATURDAY:


Visit us online for other great projects and products!
Learn the Backstitch
Hand Embroidery using the Backstitch
with
DIY Felt Pillow

Here is a cute & simple little project that you can use to work on learning new hand stitches. Even the little ones in your house can do this one with your supervision. It makes for a great quiet activity and keeps little hands busy. In case you were wondering, this activity is also great for building eye-hand coordination and strengthening those fine motor skills.
The tools needed for this activity:
- Pinking Shears
- Sharp Scissors
- Pattern/Template
- Embroidery Needle
- Embroidery Floss
- 2-8½ X 11 Pieces of Craft Felt
- Batting
- Sewing Machine (optional)
First, let’s dive into the backstitch, itself:
Give yourself a length of embroidery floss not more than 18 inches, and knot it off at the end. (I’ve used a double strand to make it easier for you to see what I am doing.)
Next, come up from the bottom side of the fabric a full stitch length ahead of where you actually want to begin.

Then, re-enter the fabric {back} where you originally wanted the stitching to begin…

…and pass the needle underneath to come up a full stitch length past where the knot was placed.

Now, re-enter the fabric from the top side {back} at the position where the knot is.

Again, pass the needle through the fabric and a full stitch length past where you came up last time.

Now, re-enter the fabric {back} where the prior stitch came through.

Continue to repeat this process until you have accomplished your goal.

Pass the thread through to the back side of the project and knot it off.
Now onto a way in which we can use this lovely and simple stitch! Use a piece of paper to create a template or pattern for your pillow.
(I cut a heart out of notebook paper, but you can probably Google just about any simple image and adjust its size in your printer’s dialog.)
Mark around the very edges of your template using pins in order to give you the ability to eyeball your stitching placement.

I knew that I wanted to stitch the word “LOVE,” so I folded my pattern piece in half in order to give me a straight line to draft the word upon.

With my sizing and spacing figured out, I wrote directly on the felt above my sample writing on the paper.

Through the top layer only, I began my backstitching.
There are lots of ways to do this: You can use a grid to help you with stitch consistency by marking where your stitches should begin. There is a fabulous product out there called Tiger Tape that Quilters use for stitch consistency. You could use a ruler. You could just follow the lines that you drew and try to keep your stitches the same length. I chose the plastic grid that I had handy.

*Stitch Consistency is keeping your stitches all the same length, tension, and same distance apart from each other.*
This is very hard to achieve by hand, however not impossible with much practice.
Using my grid for uniformity, I darkened where every other hole in the grid lined up. Then, I began my backstitch, as shown before, from the underside of the fabric one stitch ahead of where I actually wanted to begin.


Now that you’re finished with the hand embroidery, layer the two pieces of felt together, replace the pattern & move the pins to secure the pattern piece in place. Using pinking shears, cut around the outside of the pattern, leaving about an inch of space between the cut line and the pattern.

With your machine (optional) you can stitch around the perimeter of the pattern piece. If you’re really ambitious, you could just backstitch the perimeter. Remember to leave an opening in order to stuff this cute pillow. Then, simply close it with whatever means you chose to sew the perimeter.
You’ve done it! What an adorable way to practice your hand stitches! This would make a great teacher gift for Valentine’s Day, pet toy, doll cradle decoration, or seasonal decoration. Make three different hearts for Valentine’s conversation hearts as a table centerpiece. Do you have a special neighbor or friend? Is there a nursing home or rehab center nearby? This could really make someone’s day!
With whatever pattern you choose, and whatever word(s) or shape(s) you add, may you truly enjoy the process. Have fun!
Warmly,
Jen & Dee

***Click HERE for a PRINTABLE version.
Check this out:
You can learn this skill and so much more in our NEW CURRICULUM, called
You CAN Sew! Quilting Edition
Coming Soon!
We’ve joined the following hops to share our ideas this week: (Please visit one, or all, of these great sites for countless free project ideas and inspiration! If you are visiting from one of these great sites, thank you for coming!Your comments are truly appreciated.)
MONDAY:


TUESDAY:
WEDNESDAY:
THURSDAY:
FRIDAY:
SATURDAY:
Please visit us online for other great projects and products!
We’d love for you to “Like” us on FB & Follow us on Twitter @Modesty_Matters, too!
Last Minute DIY Gift:
DIY Fabric Tissue Case

These make great stocking stuffers or small gifts. Quick & Easy! They’re great for your purse, diaper bag, or in the car. These could even be donated to a nearby church, nursing home or rehab facility. My daughter loved these and made some for all of her friends for Christmas.
Here are the things you will need to create these adorable tissue covers: Three (3) identical pieces of fabric measuring 5½” by 3½” for the small,
(or 11 ½” by 7½” for the large), sharp scissors and a hem ruler.

Fold two (2) of the pieces in ½” along the long side and press.

Fold these two (2) pieces again (1″ for the small size, and 2½” for the large size) and press.

Overlap the folded edges on top of the bottom piece with right sides together.

Straight stitch all the way around the rectangle at ¼” seam allowance for the small and ⅝” seam allowance for the large size. Clip corners.

Turn right side out and insert tissue.

For the small, insert small tissue packets leaving on the plastic.

For the Large, remove the flat tissue from a box of about 100 two ply tissues. Insert the tissue alone without the box.


I hope you enjoy these. They are a great way for a young lady to make her own gifts for her friends, or even as a ministry donation. Enjoy!
Merry Christmas!
Warmly,
Jen & Dee
***Click HERE for a PRINTABLE Version.
We’ve joined the following hops to share our ideas this week: (Please visit one, or all, of these great sites for countless free project ideas and inspiration! If you are visiting from one of these great sites, thank you for coming!Your comments are truly appreciated.)
MONDAY:
TUESDAY:
WEDNESDAY:
THURSDAY:
FRIDAY:
SATURDAY:
Visit us online for other great projects and products!
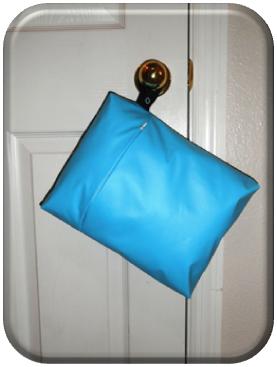
DIY Wet Bag
DIY Wet Bag
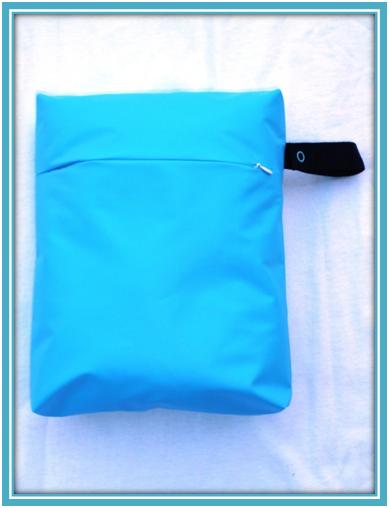
If you are into cloth diapers and/or cloth momma pads for the sole purpose of being more green, or simply more healthy, then this wet bag is for you! Even if it has nothing to do with being green, this wet bag may be right for you. It is re-useable, so it creates less waste. It is customizable, so it can be very personalized. It’s portable, so it can travel wherever you go. It can hang on the bathroom door knob (or any door knob) for convenience without creating an eyesore.
I personally use it when I travel in order to keep my unmentionables unseen. It is a great dirty laundry bag for those items you don’t really want others seeing…and, it is washable!
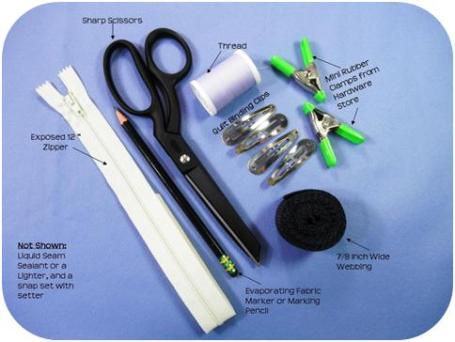
Materials:
- 28″ X 12″ Piece of water proof or water resistant fabric like PUL (left) or ProCare Barrier Fabric (right)
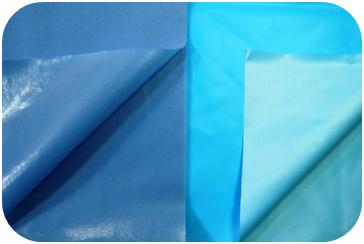
PUL (LEFT – Purple) is a vinyl (shiny) backed fabric that is soft to the touch. It feels a lot like flannel on the “right side.” PUL is lighter or less thick/dense than ProCare Barrier fabric. ProCare (RIGHT – Aqua) is similar to a durable vinyl tablecloth with the exception of the backing being some sort of affixed woven mesh with a matte finish. PUL is commonly used in cloth diapers and diaper covers, both infant and adult. ProCare is hospital grade, non-woven, waterproof fabric.
- 7-9″ Exposed Zipper
- A Zipper foot and a Teflon (non-stick) Universal Foot for your Machine
- 8-9″ Long Piece of ⅞” Wide Webbing
- 1 Complete Snap Set
- 8-10 Quilt Binding Clips or Rubberized Mini Clamps from a Hardware Store (No Pins b/c we don’t want to create holes for liquid to sneak through.)
- Thread
- Marking Pencil
- Sharp Scissors
- Sewing Machine
Instructions:
Remove the selvages from the piece of fabric.
ZIPPER: The two shorter edges will be where the zipper goes, so lay the piece of fabric in front of you in a tube shape with that opening between the two shorter edges facing up. You should be looking at the “right” side of the fabric which is the side you want to see when the project is finished.
Lay the zipper, centered, on one side of the opening. Mark where it begins and ends.
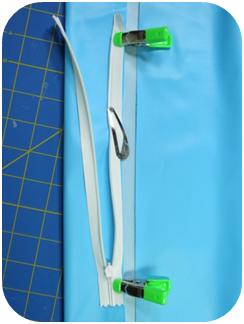
Placing right sides together, sew a straight stitch using a 5/8 inch seam allowance from your mark to the nearest edge on both sides. Remember to lock your seams.
(If you are using an invisible zipper, now is the time to press it open. Zipper instructions are always included with the zipper when purchased – it’s part of the packaging.)
Place your zipper back in the center and secure it. Keep in mind how you want the finished product to look and work. Doing so will help you make sure you get the zipper in the correct way.
Notice above, the front of the zipper is facing the “right” side of the fabric and the whole zipper is moved over to the right hand side. Using the appropriate zipper foot, sew this side in place. Zip up the zipper and secure it in place on the other side of the fabric.

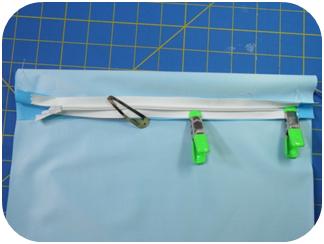
Now, sew this side of the zipper in place.
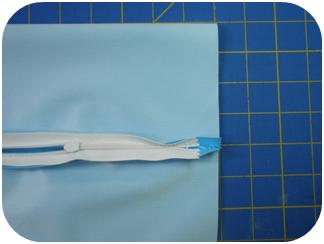
You should currently have a tube with a zipper inserted. Flatten out this tube and roll the zipper over the top by about four inches so that the zipper will be on the front of the bag, rather than the top.
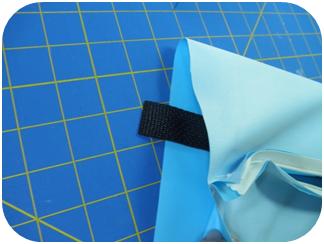
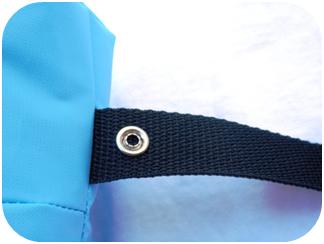
WEBBING: Fuse the ends of the webbing, either by melting them or by sealing them. Decide on the placement of your webbing, and tuck it inside the tube aligning its edge with the raw edge/side seam of the bag. I like it on the side of the zipper when it is completely closed, so I placed mine just above the seam on that side. (I made it stick out so you could see it.)
Straight stitch, using your Teflon* universal foot, down the right side of the bag using a ⅝” seam allowance. Remember to lock your seams. Unzip your zipper, and straight stitch down the left side. Again, lock your seams. Now, we’re ready to add gussets!
*If you do not have a Teflon foot for your machine, you can use a piece of cellophane gift wrap tape on the bottom side of your regular universal foot. Remember not to cover the area where the needle will penetrate the fabric. Keep that slit or hole free of tape so as to not gunk up your needle.
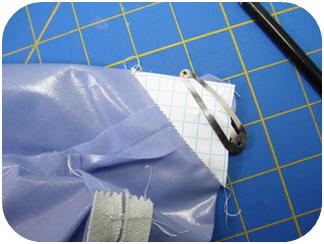
GUSSETS: Gussets increase the amount of useable space in a bag like this, and they are so simple to incorporate! There are several ways to do this. One way is to measure and mark as we did with the Zippered Pouch, and another it to create and use a template as such:
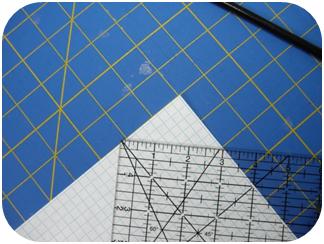
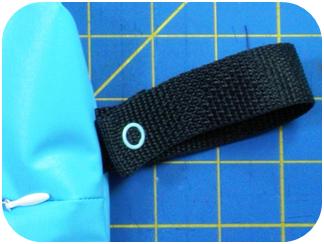
I wanted my gussets to be 3″ deep, so I measured a triangle from the corner of a piece of grid paper (any paper will do). I lined up the paper with the grid lines on my cutting board. When the measurement reached 3″ across the triangle’s base as shown above, I drew a line, and cut off the triangle. Of course, you’ll need to make sure the sides of this right triangle measure the same length too – hence, my grid. =) For you wonderful math people out there, just use the algorithm a2 + b2 = c2.
Roll the side seam at the corner until the seam itself is centered in the triangle. Secure the template. Straight stitch across the long edge of the triangle. Lock the beginning and ending of this seam. Repeat this procedure on the other three corners.
You can trim the fabric triangles off leaving ¼” to ⅝” seam allowance, if you want to.
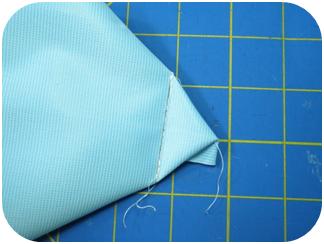

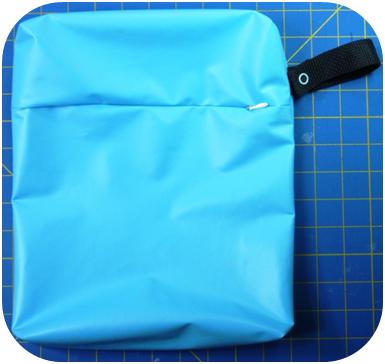
Turn the bag right sides out and admire your handiwork. Not only have you inserted a functional zipper, but you’ve made gussets as well! Good job!
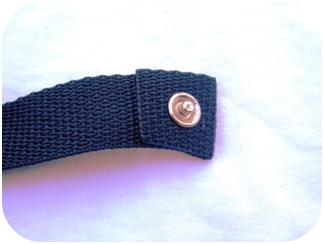
SNAPS: The final step is to place your snaps (according to your snap setter … there are several different kinds) on the webbing to create a loop for holding or hanging the bag. Fold over the far end of the webbing by about an inch and affix the one side of the snap set. Then, fold that piece over toward the bag in order to place the other half of the snap set where you want it to be for a good fit.
Ta-Da!
You CAN Sew!
***Click HERE for a PRINTABLE version.
We’ve joined the following hops to share our ideas this week: (Please visit one, or all, of these great sites for countless free project ideas and inspiration! If you are visiting from one of these great sites, thank you for coming!Your comments are truly appreciated.)
MONDAY:
TUESDAY:


WEDNESDAY:


THURSDAY:

FRIDAY:
SATURDAY:
Visit us online for other great projects and products!
Creative Deviations
Hello! I am recovering from the flu, but found enough energy to post this “must see.” I have some fun creative deviations for you from last week’s project where we made the DIY Felt Gift Card Holder / Ornament that resembled a wrapped gift. Just look what else you can do using some felt, embroidery floss, ribbon, and a few of the same hand-stitches:

Creative Deviations
How about a cute Santa belt? Just slit a piece of black ribbon and thread the gold ribbon through it!

Keeping your skills sharp – Here is another example of the gift card holder featured above using a different shape:
Simply get one of your favorite little people and trace around their hand like a mitten. Use this drawing as a template.


The mitten and cuff (Cut 2).

Simple adornment: Wreath. (Cut 1)
Pin the wreath (looks like a large “o”) on the top layer of the mitten, secure it with a blanket stitch or a simple running stitch, and add French Knots to simulate holly berries. Then, use the blanket stitch to secure the two mitten shapes together. Be sure to leave the top open for the gift card by only blanket stitching through the top layer along the cuff.
Here it is!

Add some large dots for berries with a couple of leaf shapes and you have this sweet little holly berry mitten gift card holder:

Let’s go cuff-less!
I simply cannot forget the snowman! I just overlapped two paper circles, one smaller than the other, and taped them together. Then, I pinned them to the felt and cut around the perimeter. Again, just blanket stitching and French Knots!

Have fun with your own creative deviations! You CAN Sew!
Warmly,
Jen & Dee
We’ve joined the following hops to share our ideas this week: (Please visit one, or all, of these great sites for countless free project ideas and inspiration! If you are visiting from one of these great sites, thank you for coming!Your comments are truly appreciated.)
MONDAY:
TUESDAY:
WEDNESDAY:
THURSDAY:
FRIDAY:
SATURDAY:
Visit us online for other great projects and products!
DIY Gift Card Holder
DIY Gift Card Holder/Ornament
Tutorial and BOGO Offer
We decided to bring our blog to you along with a special Black Friday BOGO offer! First, a fun tutorial the way we present them on the blog; and next, an unbeatable offer exclusively from Modesty Matters!
Sometimes finding the perfect gift for that special someone can be difficult. One thing that never gets old or goes out of style is gift cards. I know what you’re thinking….boring. Right? Not when you add some of your personalized handiwork to the presentation. You can make a very simple, yet touching (because you took the time to make it yourself with them in mind – scroll down to the bottom to see other great options) gift card holder that can double as an ornament or be re-used by the recipient to present a similar gift to another person. These are great for Christmas, Chanukah, birthdays, a thank you, a teacher appreciation gift, rewards – pretty much any occasion that calls for a gift. The options are limitless. Choose colors appropriate for the celebration, or the recipient’s favorite color.

Materials:
- 1-8½ X 11″ piece of felt for the main color
- 1-8½ X 11″ piece of felt for the accent color
- Embroidery Floss
- Embroidery Hand Sewing Needle
- 6-8 inches of ⅜” Grosgrain ribbon
- Liquid Seam Sealant or a Lighter
- Sharp Scissors
- Pins
Instructions:
Cut two 3″ X 4″ rectangles from the main color.
Cut ½” wide strip the length of the piece of felt (using the longer side) from the accent color.
Place the strip vertically centered on one of the rectangles. Align the top edge of your rectangle with the top edge of the accent strip. Pin this piece in place. Trim off the excess.
Thread your embroidery needle with about 18 inches of all 6 strands of embroidery floss. (Embroidery floss is actually 6 strands of thread twisted together to make a thicker piece.) Knot off the end. Coming in from the under side, tack the middle of this vertical strip in place with a single stitch. Leave this as is – without knotting off the single stitch – while you place the left-over piece of felt from before.

Carefully make a knot with the left-over piece of felt. (Avoid pulling or tugging too hard on the felt as it may separate.) Place this knotted piece in the center horizontally and pin it in place (optional). I simply eyeballed the area that would be covered by this strip.
Back to the embroidery needle and thread: Creating a French Knot
Choose a random place to come up from the under side. Once you’ve pulled the thread through, hold the thread with your free hand, and use the needle to pull the floss, near the felt, towards you. Wrap the needle three times with the floss.

Now take the needle and insert it into the felt immediately next to the place where it came out of the felt. Use your free hand to keep the wrapped thread touching the felt as you pull the needle back through.

Pull the needle and the length of thread all of the way through while holding the wrapped thread. Gently pull until taught.

This is basically what your knot should look like from the top side.

Now, choose a few other random places to repeat this process until you are happy with the decoration you have created.

Now, we’re ready to secure the front piece that we’ve pinned and decorated to the back piece. Layer the two rectangles and re-insert the pins through all layers.
Back to the embroidery needle and thread: Creating a Blanket Stitch
The blanket stitch is often used to bind the edge of a piece of fabric that will not unravel, in a decorative fashion.
This time, separate the strands of embroidery floss so that you are only using two strands for this set of stitches. Knot off the end, and then insert the needle from the back side of the front rectangle about ¼ inch from the edge.

Pull the thread through to the knot and then insert the needle ¼ inch away vertically through both layers of felt.

Do not pull this all the way through. Leave a small loop. Take the needle and come up from the back side through that open loop and tighten.

Then, repeat this process all of the way around the piece.

Inserting the Grosgrain Ribbon: Before you reach the corner, seal the ends of your ribbon with either a quick pass of a lighter (which melts the fibers together) or with liquid seam sealant. Pin the ribbon between the layers, and incorporate it into your blanket stitch as just another layer to pierce with the needle.

REMEMBER TO ONLY STITCH THE DECORATIVE LAYER (not through both layers) ALONG THE TOP. (We need that opening in order to insert the gift card.)
Knot it off at the end, and try to conceal this knot between the layers.
You did it! Good work!
You CAN Sew!

Would you like more gift-giving ideas?
CHECK OUT OUR BOGO OFFER BELOW!
Please visit us online for our Black Friday BOGO on
and
SAVE $24.95!
Keep them both for yourself and make your gifts this year, or give the gift of skill by sharing one of your copies with a friend or loved one. Just add one of these two titles to your cart and we’ll automatically send you the other title for FREE! (This offer is valid NOW through November 25, 2011)


Do you ever struggle with what to get that special someone, or how to wrap it? Are you unsure of how to show them that you care without spending a small fortune? The solution is here! “You CAN Sew: Gifts for Him” and “You CAN Sew: Gifts for Her” offers many simple, do-able suggestions for handmade gifts from the heart. All you need is a sewing machine, thread, scissors, and some fabric, one or both of these reusable DVD sets, and you are on your way! These step-by-step DVD sets alone are also great gifts for loved ones who enjoy working with their hands.
“You CAN Sew: Gifts for Him” includes the following titles:
- The Grill Apron
- The Grill Mitt
- A Handsome Gift Bag
- A Handy Nail Apron
- Leisure Pants (with a pocket)
“You CAN Sew: Gifts for Her” includes the following titles:
- The Decorative Pillowcase
- Drawer Sachet
- Flattering Kitchen Apron
- Drawstring Satchel
- Gusseted Gift Bag with French Seams
When you really care about someone, you want them to feel loved. Showing them by using your skills to create something, with just them in mind, is a great place to begin. Just knowing that they were worth your time and energy is sure to please even the pickiest of folks! Get ready for the heartfelt, ear-to-ear grins you’ll be getting because You CAN Sew!
Warmly,
Jen & Dee
Start taking advantage of this special offer now!
Thank you for supporting Small Business Success!
We’ve joined the following hops to share our ideas this week: (Please visit one, or all, of these great sites for countless free project ideas and inspiration! If you are visiting from one of these great sites, thank you for coming!Your comments are truly appreciated.)
MONDAY:
TUESDAY:
WEDNESDAY:
THURSDAY:
FRIDAY:
SATURDAY:
Visit us online for other great projects and products!
DIY Hide-A-Way Pillow
DIY Hide-A-Way Pillow

As moms, we are constantly trying to find things to keep our little ones happily (& quietly) occupied in the car, at sporting events, gatherings, in the grocery store, and at church. This simple little pillow (yes, simple!) combines activity, storage, and comfort all in one great, straightforward project. It is a pillow for rest and comfort, and a secure storage pocket for crayons & a coloring book, a favorite toy or book, a video game…you name it! The options are endless. Let’s sew!
Items needed:
- 4 – 20 X 20 pieces of fabric of like composition (all flannel, all knit [use a stretch needle on your machine], or all cotton broadcloth…if you choose fleece for the outer 2 layers, you may want to go with something less bulky on the inside like flannel or cotton calico)
- Sharp Scissors
- Fabric Pencil or Evaporating Marker
- An 12″ Zipper (not invisible)
- A Hand Sewing Needle (ball-point for knits)
- Coordinating Thread
- Pins
- Machine (Straight Stitch and Zigzag Stitch)
- Poly-Cotton Batting/Stuffing

Cut all pieces in any shape that you want your pillow to be. We chose a square for simplicity. Be sure to cut a total of 4 pieces, two for the inner (hidden) pocket and 2 for the outer pillow.

Stay stitch (long, machine basting stitch using 3-5 spi) along the upper side (choose which of the four sides will be your “upper” side) and zigzag stitch along the same edge to prevent fraying.

Center the zipper along upper edges that you just zigzagged and mark. Return to the machine and straight stitch at 5/8″ seam allowance from each mark to the outer corner. Then, press that seam open.


Baste the opening closed by hand. This will assist you in properly lining up, and sewing in, the other side of the zipper. (These stitches will be removed later, so don’t worry about whether or not they look pretty.)

Place zipper on the basted-closed opening. Pin in place.

Straight stitch (5-8 spi) the zipper in place overtop of the basted opening. Remove the basting stitches.

Pin the remaining three sides together.
(Right now, you have 4 layers of fabric sewn together with a zipper at the top: inner | outer | outer | inner, and three open sides.)

Straight stitch at 5/8″ seam allowance, beginning at upper right corner, pivot (raise your presser foot with your needle down, turn the piece, then lower the presser foot) and stitch part way across the bottom. Lock your seam (backstitch, or sew in reverse, at the end of the seam just a few stitches). Leave a 5 to 7 inch opening to stuff your pillow, and begin your seam again. Pivot at the corner, and straight stitch up the other side to the end corner.

Zigzag Stitch along those same three edges to finish the seams and keep them from fraying.

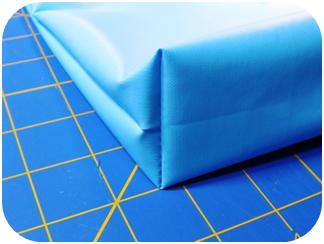
Turn the pillow right sides out, fold in the edge to match the existing seam allowance, and whipstitch the inner pocket closed by hand. Add Stuffing between the sewn pocket and the outer layers on both sides.

Just like you whipstitched the inner layers of the pocket together, whipstitch the outer two layers of the pillow closed as well.
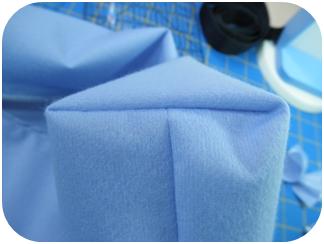
You DID it! Here is the finished Hide-A-Way Pillow showing the zippered pocket.

Here is the finished pillow with a few toys peeking out.

Here is the finished pillow, with the toys concealed in the Hide-A-Way pocket.

This is a great travel anywhere accessory! Want to modify it? Go ahead – Have fun with it! I could see this on a smaller scale being a fantastic tooth fairy pillow!!!! (I know an adorable little boy with matching PJ pants who might just use it for a frog or two! {Let’s hope not!} LOL!) What might you use this fun storage pillow to hide?
***Click HERE for a PRINTABLE version!
We’ve joined the following hops to share our ideas this week: (Please visit one, or all, of these great sites for countless free project ideas and inspiration! If you are visiting from one of these great sites, thank you for coming! Your comments are truly appreciated.)
MONDAY:
TUESDAY:
WEDNESDAY:
THURSDAY:

FRIDAY:
SATURDAY:
Visit us online for other great projects and products!